AWT COMPONENT CLASSES:
The awt package provides the following types of controls for user interface design .
- label
- Text Fields
- Buttons
- Check Boxes
- Radio Bottons
- Choice lists
- Lists
- Scroll bars
- Menu bars and menu items
1. label: the object of label class is a component for placing text in a container. it is used to display a single line of read only text. the text can be changed by an application but user can't change directly.
example:
import java.awt.*;
class layExample
{
public static void main(String[] args)
{
Frame f=new Frame();
f.setVisible(true);
f.setSize(400,400);
f.setBackground(Color.RED);
f.setTitle("login page ");
f.setLayout(null);
Label l1=new Label("username");
l1.setBounds(50,100,100,30);
Label l2=new Label("password");
l2.setBounds(50,150,100,30);
f.add(l1);
f.add(l2);
}
}
output:

2.Text Fields :The object of a Text Field class is a text component that allow the editing of a single line of text.it is inherit the TextComponent class.
example:
import java.awt.*;
class TextFieldExample
{
public static void main(String[] args)
{
Frame f=new Frame();
f.setVisible(true);
f.setSize(400,400);
f.setBackground(Color.BLUE);
f.setTitle("login page ");
f.setLayout(null);
TextField t1=new TextField("hello");
t1.setBounds(50,100,100,30);
TextField t2=new TextField("US");
t2.setBounds(50,150,100,30);
f.add(t1);
f.add(t2);
}
}
output:

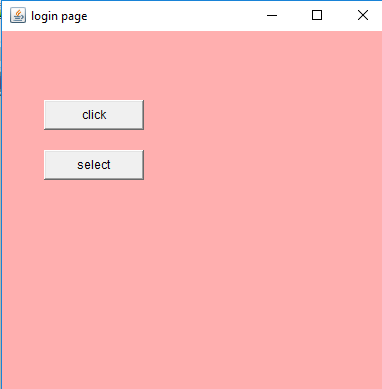
3.Button:Buttons are create by using Button class. it can be a part of container class.it is very important component of AWT.
EXAMPLE:
import java.awt.*;
class ButtonExample
{
public static void main(String[] args)
{
Frame f=new Frame();
f.setVisible(true);
f.setSize(400,400);
f.setBackground(Color.PINK);
f.setTitle("login page ");
f.setLayout(null);
Button b1=new Button("click");
b1.setBounds(50,100,100,30);
Button b2=new Button("select");
f.add(b1);
f.add(b2);
}
}
output:
4.Checkbox control:The Checkbox class is used to create a checkbox. it is used to turn an option on (true) or of(false)
Example:
import java.awt.*;
class CheckboxExample
{
public static void main(String[] args)
{
Frame f=new Frame();
f.setVisible(true);
f.setSize(400,400);
f.setBackground(Color.PINK);
f.setTitle("login page ");
f.setLayout(null);
Checkbox c1=new Checkbox("java",true);
c1.setBounds(50,100,100,30);
Checkbox c2=new Checkbox("php",true);
c2.setBounds(50,150,100,30);
f.add(c1);
f.add(c2);
}
}
output:


Radio button controls:There is no direct control class for creating radio buttons inn AWT,but checkboxGroup enables you to create them.
import java.awt.*;
class RadiobuttonExample
{
public static void main(String[] args)
{
Frame f=new Frame();
f.setVisible(true);
f.setSize(400,400);
f.setBackground(Color.GREEN);
f.setTitle("login page ");
f.setLayout(null);
CheckboxGroup cbg=new CheckboxGroup();
Checkbox c1=new Checkbox("Male",cbg,false);
c1.setBounds(50,100,100,30);
Checkbox c2=new Checkbox("female",cbg,true);
c2.setBounds(50,150,100,30);
f.add(c1);
f.add(c2);
}
}
output:


